Do you know that the Wordpress these days empower almost 80% of the websites across the wold. And in that 80% alot of wesbites are personal blogs, ecommerce websites, company websites, small venture websites, fund raising websites, charity website, etc. You name the webiste, and boom it is powered by Wordpress.
Ecommerce webistes like SUKHIM, where you will find only handmade products from across India, is powered by wordpress. The company website for SEO Spider is powered up by Wordpress, and the list goes on and on.
With the availability of more than million plugins, and code snippets, Wordpress make it really easy to make a webiste, that just does exactly what you want to achieve from the website. However, there is always a downside to use of multiple plugins in a website. This causes website to be alot slower and unresponsive at times.

Google pagespeed insight & GTMetrix is where you can track the performace of your website. However this is only the technical aspect of your website. Metrices like First Contentful Paint (FCP), Largest Contentful Paint (LCP), First Input Delay (FID), Cumulative Layout Shift (CLS), Speed Index, Time to Interactive, Total Blocking Time are used to measure the performance.
Once you run the test, you will get a fair idea of how the website performs in various devices.
Before we begin, we will show you the unoptimized score of the website that we are about to optimize, and at the end of the tutorial you will see the new optimized score. This is the proven method and a simple plugin that takes care of all the aspects and makes the website really fast.
What does PageSpeed Insight and GTMetrix does?
Why it is important to have fast website?
- Navigate to your cPanel in your hosting panel and find "Select Php Version".
- In the PHP Selector Window, you should be able to find the PHP Extentions.
- Activate the "memcached" and "redis".
- Once activated, come to the wordpress website, and install "litespeed cache".
- Install and activate the plugin.
- Now, please carefully make the following changes from each menu item of the litespeed cache.
- Click on the "Litespeed Cache" on the left menu of the WordPress.
- You will now be in the "Dashboard" section of the plugin.
- Hover on the left side menu, and click on "General" to enter the "General Settings"

- Click on "Get Domain Key" and wait for the server to release the domain key for your domain.
- While you are waiting for the domain key, click on the "check my public IP". Copy the IP displayed and paste in the server box, and save the changes. Make sure to turn on the buttons as shown in the image in this tutorial.

- Hover to the left menu and click on "Cache".
- Make the changes as shown in the figure, and hit save.

- Do not make any changes that is not mentioned in this tutorial. Doing so will totally break your webiste, and you might have to redo the website work from the scratch.

- Do not make any changes to the TTL. Turn on "Purge All on Upgrade", and hit Save.

- No changes in "Exclude" as well. Come to ESI Setting. Switch on the Enable ESI, switch off the "Cache Admin Bar" & "Cache comment Form" to set On.

- Click "Object" and make the changes as mentioned below.


- Download Slider Revolution activation Key.
- Click "Save" and click on Browser Cache, and turn on. Save the changes and navigate to CDN from the left menu.

- If you are already using a CDN, like cloudflare, get the details and update as shown in picture, and click Save.

- Click "Image Optimization" from the left menu. Make the following changes in the "Image Optimization Setting"

- Now click on "Image Optimization Summary" and hit "Send Optimization Request"

- Click "Page Optimization" from the left menu. And make the changes as shown in image.


- Click "Save" and head over to "JS Setting". Again, follow the image below, and hit Save.
- Forza Horizon 4 not working in your PC? Download & Fix it here.

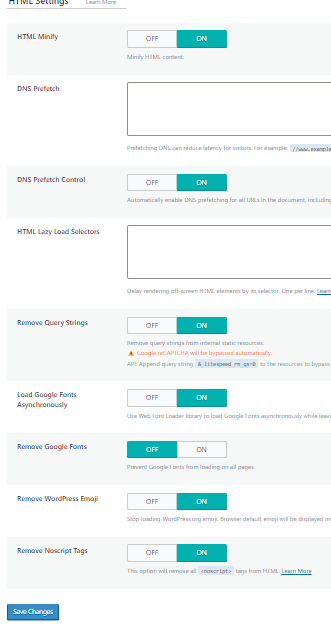
- Follow the HTML Setting, and click "Save" again.
- In the Media Setting, follow the image below.


- Please do not make any other changes apart from the above mentioned.
